

Our whole universe was in a hot, dense state
Then nearly fourteen billion years ago, expansion started, wait
The Earth began to cool
The autotrophs began to drool
Neanderthals developed tools
We built a wall (We built the pyramids)
Math, science, history, unraveling the mystery
That all started with the Big Bang (Bang)
Recognize the lyrics above?
Fans of the big bang theory tv series would have a nostalgic smile decorating their faces right now.
Whether you are a fan or not though, everyone will be carried along on this exciting performance of an article.
The Big Bang Theory is a comic tv series that aired from 2007 to 2019 about a friend group of six science nerds, who navigate many life experiences in the academic world and eventually emerge victorious in their individual professions. It’s a fitting inspiration for this story in which I will carry you along as your loyal tech friend with a wacky sense of humor (😎) to navigate an exceptionally useful blockchain platform that could completely revolutionize your web 3 development ideology.
Getblock is a real big bang in the blockchain universe!


So you’re a tech guy/babe looking to get into he web 3 space. You already have some experience. You can clearly explain the front end and backend dichotomy. Maybe you already have some web apps hosted or some mobile apps uploaded on application stores. But you still want more. The cyberspace has been agog with tales of web 3 technology and the great future it promises. Crypto billionaires are already being created and you want to cash in on the technology now that it’s still young. You’ll love your share of the blockchain pie right? Well, me too, let’s share the experience.
Now, you’re getting into web 3. Have you learned solidity? No? That’s the language you use to write your smart contracts. Smart contracts are classes (package of code including certain data and functions that work on them) which outline the rules/algorithms governing the operations of a web 3 project. They are coded on a an editor and are uploaded to the blockchain to function (e.g., same way you would upload web 2 code to a server).
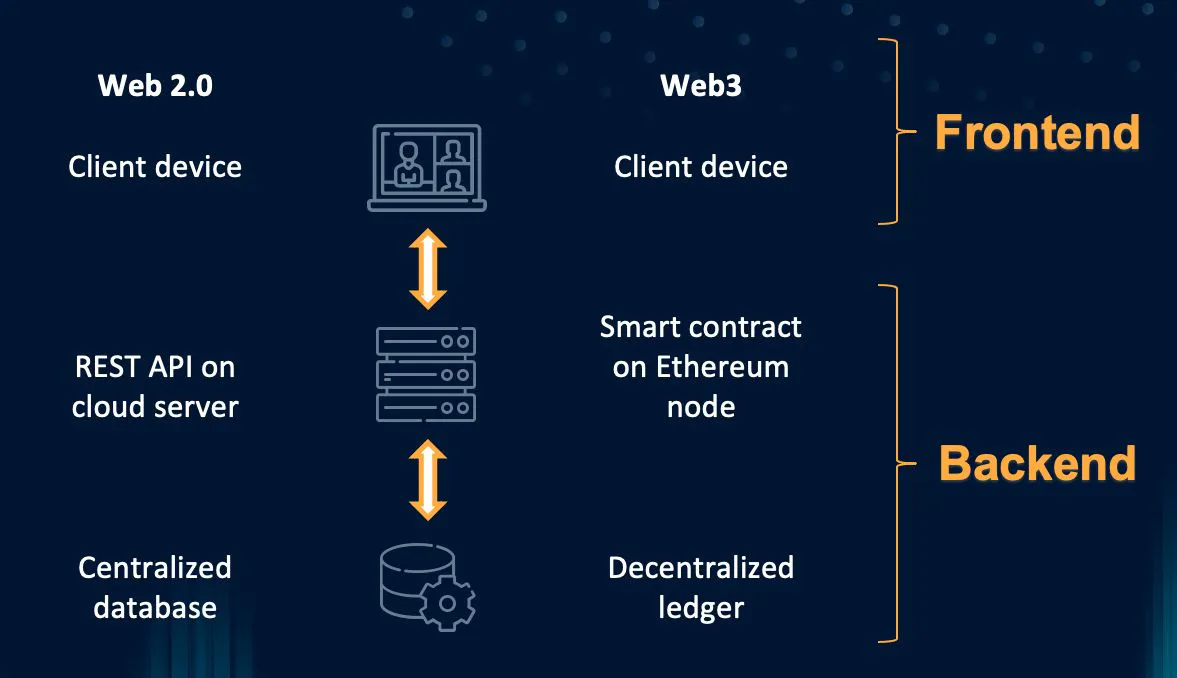
The blockchain represents the backend of web 3 technology. Not fully clear on this? No problem, back to the basics. Most software applications are divided into two parts for easy operation. The frontend and the backend. The frontend represents the user interface which allows users to easily interact with the technology. The backend represents the problem solving and data management side of the technology where most of the heavy lifting in the software application is handled. The backend is usually stored on an online server and an Application Package Interface (API) is used to connect the frontend on the users phone to the backend on a server somewhere. This is the basic architecture of a software application.
However, due to the great difficulties of building a backend from scratch, companies arouse which offered backend services like cloud platforms so developers can easily assemble the frontend code and connect to the ready made backend platforms available for use, considerably simplifying the development process.


That’s web 2 technology though were the backend is handled by centralized servers. In web 3 the blockchain itself (a decentralized global database) acts as the backend and the backend code which does the data management work are the smart contracts that users write and upload to the smart blockchain.
Usually, users can download a blockchain software on their device and use it in building web 3 applications but the backend as a service option which revolutionized web 2 technology has also taken hold in the web 3 space. Just like in web 2, backend as a service platforms simplify the development process by handling all the heavy lifting associated with data management while the developer focuses on developing a frontend and writing the smart contracts. Web 3 gateways (libraries, APIs and Remote Procedure Call (RPC) providers then connect this frontend created with the backend as a service platform. This is where Getblock comes in.

Blockchain technology has permeated the entire globe and almost everyone on the internet is spewing crypto slangs to sound cool. Great if you ask me. Asides the awesome PR though, people still have to understand how to navigate the technicalities of blockchain technology and utilize the system for maximum benefit. The blockchain, however exciting it sounds is a rather technical and recent technology which a lot of people around the world are yet to fully understand hence, they can’t benefit. This complicated access to the underlying infrastructure triggered the development of web 3 gateways which are explained below;
- Web 3 libraries are collections of code which are integrated in the crypto software to easily connect to the blockchain.
- Web 3 APIs are data structure keywords to easily access data and functionality from the blockchain.
- RPC providers grant access to RPC nodes which are blockchain nodes that coordinate other blockchain infrastructure.
Though often marketed as an RPC provider, Getblock is a better defined as a robust web 3 provider platform, handling both API and RPC services online for easy access and management of blockchain functionalities by developers.

GetBlock is a full-node-as-a-service platform that provides instant access to over 50 blockchain protocols through unified APIs. It is designed for developers who want to connect to major blockchain networks without running and maintaining their own infrastructure. GetBlock Web3 RPC Provider is the best service for connecting to blockchain nodes and the right solution to expand the capabilities for your web3 projects.
GetBlock is an ideal solution for developers seeking speed, scalability, and multi-chain access with minimal infrastructure overhead. It’s trusted by startups and enterprises alike to power Web3 products across ecosystems.
Now my good friend, enough with the chit chat introduction, this is an article for nerdy tech professionals; let’s get technical!


Welcome to Getblock
A simple glance at the introduction page of the Getblock documentation shows following mission statement;
Welcome to GetBlock.io! We make it easy for developers and businesses to connect to 50+ blockchain networks.
With our tools and services, you can focus on building your Web3 project without worrying about the technical details of setting up and managing blockchain nodes.
From DeFi apps and NFT platforms to analytics tools, AppChains, and more, GetBlock provides the infrastructure to help you build, test, and scale your blockchain-powered solutions.
This is already self explanatory.
Core GetBlock features
- Plug-and-Play access: Ready-to-use blockchain nodes and APIs to help you get started immediately.
- 99.9% uptime: Reliable 24/7 connection to multiple blockchain networks.
- Multi-chain support: Connect to Bitcoin, Ethereum, BNB Chain, Polygon, Solana, TON, and 50+ other networks.
- Flexible plans: From free access to enterprise-grade solutions, we’ve got options for every stage of your project.
- Custom solutions: Need something unique? We can build tailored solutions for your specific blockchain needs.
- 24/7 Expert support
GetBlock Product Demo
How to set up an account
To start using GetBlock’s services, you need to register an account. You’ll be ready to go in just a few clicks!
-
Go to GetBlock:
Visit the homepage and click on the ‘Dashboard’ button in the upper-right corner, or use this direct link.
-
Choose the sign-up method:
- Register with Email: Enter your name and email address, then verify your email to activate the account.
- Sign in via Google: Google will share your name, email, language preferences, and profile picture with GetBlock.
- Connect with MetaMask: Use a MetaMask wallet browser extension to sign up – no email or password required. If you don’t have a wallet extension installed, you’ll be prompted to add one.
- Sign up with GitHub: Use your GitHub credentials to set up an account.


Access the dashboard
Once you’ve created an account and signed in, you’ll be directed to the GetBlock Dashboard. Here, you can create endpoints, monitor your usage plan, and access statistics.

Check your User ID
Find your user ID located in the ‘Account Settings’ section or simply click your account icon to view it. Please use it when contacting GetBlock’s team so we can identify your account and help you faster.

Team accounts setup
Set up your team account on GetBlock, invite and onboard team members with this step-by-step guide.
A team account is a shared workspace where multiple users can collaborate. This setup is ideal for companies and teams using GetBlock services.
Key benefits:
- Organized collaboration: Work together on company resources.
- Enhanced security: Role-based access limits each member to only the features they need.
- Efficient management: Easily switch between personal and team accounts.
A team account user is a regular GetBlock user. When invited to a team, they can work on company resources, manage service plans or team settings—provided the corresponding permissions are granted.
Creating a team account on GetBlock
This part covers a step-by-step guide to setting up your team workspace.
- Sign in to your GetBlock account. If you don’t have a user account yet, create one following this guide.
- Click on the profile icon in the bottom-left corner of the sidebar. Select “Create new team” from the dropdown menu.

- A popup window will appear. Assign a team name and click the “Create team” button.

- Once the space is created, navigate to Account Settings > Team to manage team settings or add teammates.

Adding teammates
The creator of the team account controls who gets invited and manages user roles.
Limits on GetBlock team accounts:
- Each user can create up to 3 teams.
- A user can be invited to an unlimited number of teams.
- One team can have a maximum of 30 users.
You can invite team members to join your team account using either their email address or GetBlock User ID.
- If the teammate has a GetBlock account: You can invite them using their ID. Since they are already registered, they just need to accept the invitation.
- If the teammate is not registered on GetBlock: Invite them via email so they can first create an account before joining the team.
The teammate has a GetBlock account
- Go to Account Settings > Team.
- Click “Add team member” in the top-right corner.
- Request the User ID from the teammate (they can find it under Account Settings > General).
- Enter the name, User ID**,** and send the invite.
- The user gets a notification and can accept the invite.

The teammate is not registered on GetBlock
- Go to Account Settings > My Team.
- Click “Add team member” in the top-right corner.
- Enter the teammate’s name and email address.
- Send the invite.
- The invite link is valid for 30 minutes. If it expires, please resend an invitation.
- The user will receive an invitation email with a link to sign up and join the team.

A team member is marked as when they have successfully accepted the invitation and joined the team.


If the invitation has been sent but not yet accepted, their status remains


Managing roles & permissions
Once the user has joined, the team owner or an admin can update their permissions:
- Go to My Team in Account Settings.
- Click the three-dot menu (⋮) next to a team member.
- Select “Edit access level”.
- Assign permissions:
- Endpoints: Create and manage node endpoints, access tokens, and view statistics.
- Subscriptions & payments: Handle payments and plans.
- Admin: Includes all the above permissions, plus the access to manage team settings and member roles.
- Save changes.

Revoking team access
To remove a user from your team account:
- Navigate to Team in the Account Settings.
- Click the three-dot menu (⋮) next to the team member name.
- Select “Remove” from the dropdown menu.
- When removed from a team, users lose access to that team workspace but keep their personal account.

How to join a team account
If you’ve been invited to a team on GetBlock, follow these steps to accept the invitation and join the team.
If Registered on Getblock
When you have a pending team invitation, a notification badge appears on your account icon .

- Click your account icon to view an invitation.
- Click “Accept” if you’re ready to join.

- After accepting the invitation, you are given access to your team’s workspace. Your role and permissions will be determined by the team owner or admin.

If new to GetBlock
When someone who is not yet registered on GetBlock receives a team invitation, they must first sign up for an account:
- Check your inbox for an email invitation from GetBlock.
- Clicking the invitation link redirects you to the sign-up page.
- Create a secure password for your new account.
- Check the boxes to agree to the Terms of Service and Privacy Policy and complete the registration.
The invite link is valid for 30 minutes. If it expires, ask the team owner or admin to send a new invitation.

Once registered, you’ll have your personal GetBlock account. Additionally, you gain access to the team’s dashboard and resources based on permissions given by the team owner or admin.
Next steps: Explore GetBlock
Now that you’ve joined a team, here are a few useful resources to help you get started:
Switching between personal & team accounts
A team user does not lose access to their personal account. They can still use and manage their own endpoints and subscriptions.
To switch between your personal account and any team accounts you are part of:
- Click the account icon in the left panel.
- A dropdown will show all teams & personal accounts.
- Switch between them as needed.

The teams list is sorted by recent activity, with the most recently accessed accounts at the top.
Best practices for team security
- Regularly review and audit permissions. Revoke access for users who are no longer active.
- Grant admin privileges only to trusted team members.
- Give Members only the necessary permissions (e.g., endpoints access or subscriptions management).
- Never share login credentials—use team accounts instead.
Learn how to set up custom RPC URL on MetaMask for faster, more reliable, and secure blockchain interactions.
MetaMask is a blockchain wallet available as a mobile application and a browser extension. It allows you to interact with Ethereum-based decentralized applications (dApps) directly from your browser.
Using GetBlock nodes with MetaMask makes your blockchain experience faster and more reliable than using default RPCs:
- Connect directly to trusted nodes for secure transactions.
- Enjoy quicker transactions and smoother dApp interactions.
- Experience less downtime, even during busy network periods
This step-by-step tutorial will guide you through connecting GetBlock’s powerful nodes to your MetaMask wallet.
Before you start
Set up your wallet
If you don’t already have MetaMask, download and install it from the official website: https://metamask.io/download.
MetaMask extension is officially supported on Chrome, Brave, Firefox, Microsoft Edge, and Opera browsers.
Get a custom RPC URL
Generate a JSON-RPC URL for the selected network from your GetBlock account and copy it.


Generate an RPC URL for MetaMask
Rename your endpoints to clearly indicate their purpose.
Add GetBlock RPC to an existing network
If the network is already in your list but uses a default RPC provider, you can switch to GetBlock by following these steps:
- Click on the current network name in MetaMask to open the dropdown of networks.
- Find the network you want to edit and click the settings menu next to it. Select ‘Edit’.


- Open the ‘Default RPC URL’ dropdown and select ‘Add RPC URL’.
- Paste the JSON-RPC endpoint URL from your GetBlock account (
https://go.getblock.io/)./ - Name the new RPC URL for easier identification.

- Click ‘Add URL’, then ‘Save’ to confirm.
You can now switch between RPC URLs for that network as needed.
Add a new network to MetaMask
If the network isn’t in your list, you can add it as a custom network. For this example, we will add the Polygon zkEVM to MetaMask.
- Click on the current network name.
- Select ‘Add a custom network‘.

- Fill in the required fields:
Field Description Example
RPC URL The network’s JSON-RPC URL from your GetBlock account https://go.getblock.io/
Chain ID The ID of the network 1101
Network name Fetched automatically based on Chain ID Polygon zkEVM
Currency symbol Suggested automatically based on Chain ID ETH
Block explorer URL Optional field https://zkevm.polygonscan.com/
- Click ‘Save’, and the custom network will be added and selected as default.
You can get the Chain ID of an EVM-compatible network (e.g. Polygon zkEVM) sending a request to your endpoint with this curl command:
Copy
curl --location --request POST 'https://go.getblock.io//' \
  --header 'Content-Type: application/json' \
  --data-raw '{
    "jsonrpc": "2.0",
    "method": "eth_chainId",
    "params": [],
    "id": "getblock.io"
  }'
Need help?
If you run into any issues or have questions, please check out our FAQ or visit our Contact Center. You can also use the Help button within your GetBlock dashboard to access support or submit a request.
Getblock RPC API for Dapp Development

Firstly; What is RPC in web3? This is also known as Remote Procedure Call; it is a communication mechanism that is used to interact with the blockchain networks particularly the Ethereum and other decentralized networks. In this context, RPC allows clients to communicate with the Ethereum nodes to query blockchain data, send transactions and execute smart contracts. RPC Nodes expose an RPC interface, allowing external entities to communicate directly with the nodes. Whereas APIs provide a simplified, high-level interaction with blockchain networks, RPC nodes offer raw access to blockchain functions.
Getblock is a practical choice for Web3 projects seeking a balance between cost, ease of use, and reliable access to blockchain networks. With this tool you can connect your dApp to mainnet and testnet networks with APIs: JSON-RPC, REST, WebSocket, GraphQL, etc.
Advantages
- Multi-chain Support: GetBlock supports over 50 networks, including Ethereum, BNB Chain, Bitcoin, Polygon, Solana, Near, Aptos, and more.
- Shared and Dedicated Nodes: Developers can use free/shared nodes for testing or opt for dedicated nodes for production use with guaranteed bandwidth.
- Unified API Dashboard: Centralized access point to manage APIs across blockchains.
- Scalable and Reliable: Offers high uptime, performance, and enterprise-grade solutions for production DApps.
Use Cases
- DApp Development: Build DeFi, NFT, and GameFi applications with easy blockchain connectivity.
- Blockchain Explorers: Aggregate and display blockchain data like blocks, transactions, and contract logs.
- Wallet Services: Retrieve balances, transfer tokens, and manage user accounts via the API.
- Real-time Tracking: Monitor wallet activity, smart contract events, and network states.
Popular Endpoints
GetBlock supports standard JSON-RPC, REST, and WebSocket endpoints. Examples for Ethereum include:
-
eth_getBalance: Get the ETH balance of a wallet address. -
eth_sendRawTransaction: Broadcast a signed transaction. -
eth_getLogs: Retrieve contract event logs. -
eth_call: Call a smart contract method without broadcasting a transaction. -
eth_blockNumber: Return the current block height.
With such an extensive array of capabilities, getblock sure ranks at the top of blockchain APIs for dapp development.


Conclusion
Getblock is the web 3 provider you don’t want to miss. Check it out now!