

Having multiple identical or nearly identical copies of the same photo serves no purpose, and they just take up unnecessary space on your iPhone. In the past, the only way to remove duplicates was to manually search for and delete them. But luckily, starting with iOS 16, iPhones now have a built-in tool that makes it much easier. This feature automatically detects duplicates, groups them into a separate album, and lets you “merge” them – keeping one copy and deleting the rest. However, it does have limitations, it only works with exact duplicates, so near-duplicates won’t be detected.
But what about those photos that have at least minimal differences? In this case, you can either manually search and delete them or use a third-party app with more advanced detection algorithms from the App Store.
Sounds complicated? Relax and continue reading. We’ll lay everything out clearly, providing exact steps to follow for deleting both duplicates and similar photos. By the end, your photo gallery will be more organized, and you’ll gain some free space in your iPhone storage.
How to Remove Duplicate Photos on iPhone
While different sources offer various ways to clear duplicate and similar photos on an iPhone, we will show you only the simplest methods, the iOS utility, and third-party applications. In this way, you do not waste extra effort and time. It seems logical to us to start with the utility, as it serves as a standard and basic tool.
However, before we describe all the steps, we suggest you watch a video, in case you find video guides more comfortable than text ones.
1. Use the Native “Duplicates” Utility
At the start of this article, we talked about some features of the built-in iOS “Duplicates” utility. But in case you missed it, here’s a quick reminder: it’s available on iOS 16 and later and only detects exact duplicate images. That said, it’s not always 100% reliable. Sometimes, it fails to recognize duplicates, even when you know they exist.
Many iPhone users on Reddit have reported the same issue, so if the tool doesn’t show duplicates for you, you’re not alone. Despite its limitations, you cannot ignore this handy tool. Here is how you can see and delete duplicate photos on your iPhone using this method:
1. Open the Photos app on your iPhone.
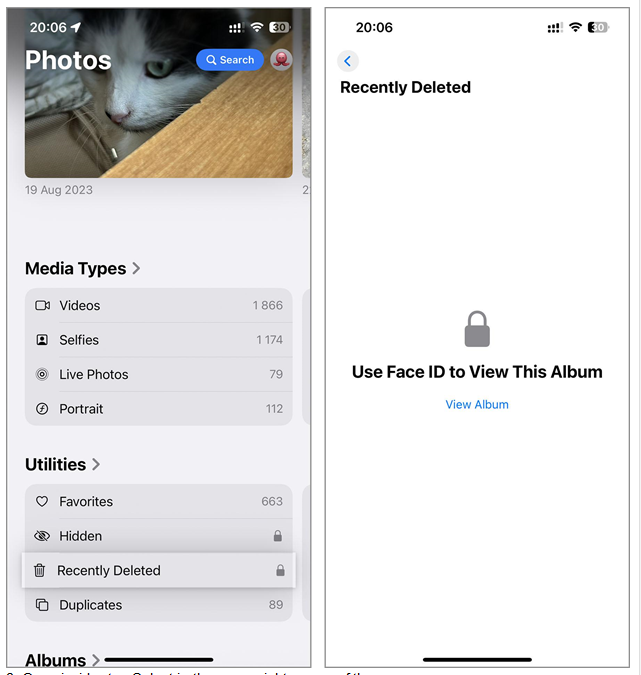
2. Scroll down to the Utilities section and tap on Duplicates. This will show you a list of grouped duplicate photos.
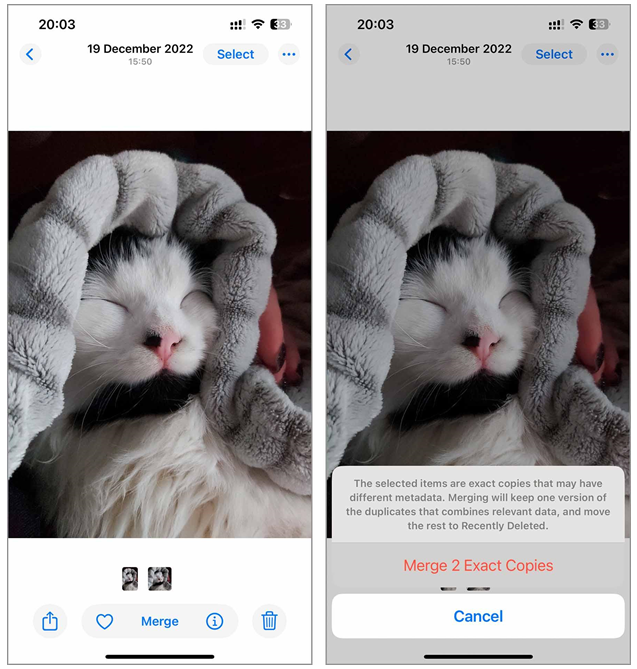
3. To merge a group of duplicates, select a group by tapping on it. You will see the details of the duplicate photos in that group.
4. Tap Merge. The system will keep the best quality photo, according to its criteria, and move the others to the Recently Deleted album.
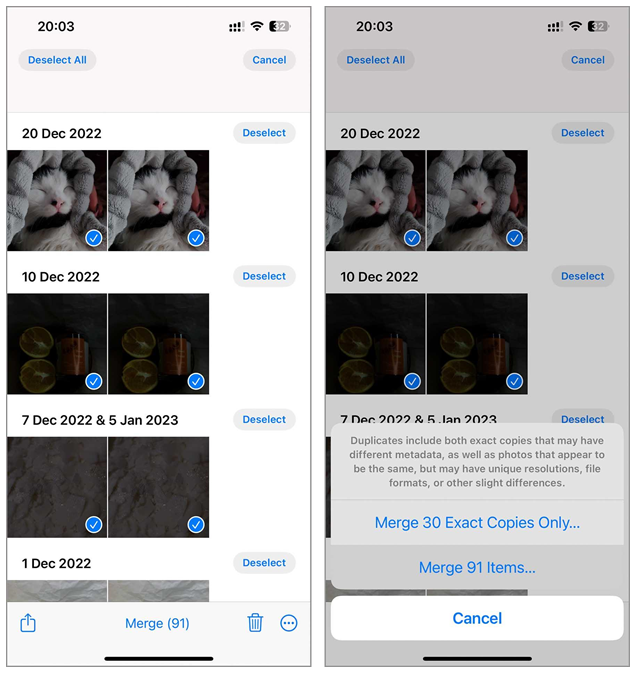
If you prefer not to handle each group of duplicates individually, there is a quicker method available. In the upper right corner of the Duplicates album, tap “Select.” Then, choose “Select All” at the top of the screen. Finally, at the bottom of the screen, tap “Merge (X).”
📝 Note: Don’t let the “Merge” button fool you, it doesn’t actually combine duplicate photos into a single image. Instead, iOS selects the best version based on its assessment and moves the rest to the Recently Deleted album. This makes it easy to clear out duplicates and free up storage on your device.
But how can you find similar photos on your iPhone using this utility? You can’t. Since iOS’s built-in tool only detects exact duplicates, it won’t help with near-duplicates. But don’t worry, we’ve got you covered. In the next section, we’ll show you the best way to find and remove similar photos.
2. Use Specialized Apps to Delete Duplicate and Similar Photos on iPhone
To find and clean up similar photos on your iPhone without manually scrolling through them, you’ll need a specialized app. Because of iOS restrictions, these apps mainly focus on duplicates and near-duplicates, using advanced algorithms to detect photos that aren’t exact copies but have slight differences, like changes in angle, lighting, or object position.
Clever Cleaner is a free app that removes duplicate and similar photos. It automatically scans your gallery, groups duplicate and similar photos together displays the results in a tile format, and selects the best photo from each group. You then have the option to delete all unselected copies with one click by using the “Smart Cleanup” feature, or you can choose to delete more selectively.
1. First, download Clever Cleaner for your iPhone from the App Store.
2. Launch the app and grant it access to your photo library. Once you provide access, wait for the app to complete the initial scan of your photos.

3. The ‘Smart Cleanup’ tool instantly clears duplicate and similar photos in one go.
4. To remove duplicates more selectively, tap on any grouped photos. Check the boxes for the images you wish to delete and select ‘Move to Trash.’

5. The selected photos will move to the app’s trash bin. You can review these photos and, if necessary, restore them before final deletion. To delete them, slide the ‘Slide to Delete’ control. All marked copies will then move to the ‘Recently Deleted’ album on your iPhone.

In addition to removing duplicates and similar photos, Clever Cleaner also offers features to delete old screenshots, find and delete large video files, and convert Live Photos to regular images, subsequently deleting the originals. While these functions stray from the main topic of this article, they can help free up even more storage on your iPhone. Therefore, if your primary goal is to clean up your device, it’s worth checking them out.
Empty the Recently Deleted Album to Finalize Duplicate Cleaning
You’ve probably noticed that each method ends with a mention of the “Recently Deleted” album. If you’re not familiar with it, here’s a quick explanation. When removing an image or video in the Photos app it does not disappear completely. It moves to a place called “Recently Deleted“, where it remains for 30 days. This gives a chance to bring it back if needed.
This album exists because once a file is permanently deleted, without a system backup, it can’t be recovered. However, as long as something stays in that folder, it still occupies storage. To immediately create space, clearing out this folder can be done manually instead of waiting for the 30-day period to end.
1. Open the Photos app on your iPhone and scroll to the Recently Deleted album.
2. Tap to open the album. You might need to enter your app ID or password to access this album.
3. Once inside, tap Select in the upper right corner of the screen.
4. Choose Delete All to remove all items from the album or select specific photos you wish to delete permanently.
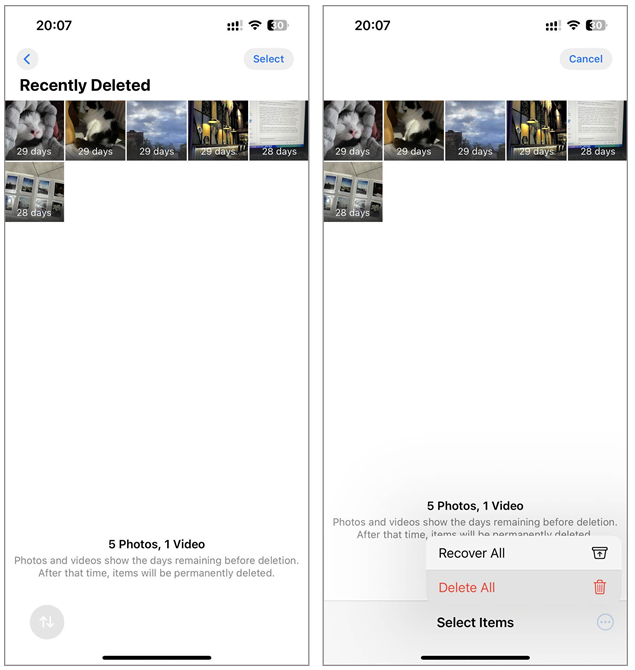
5. Confirm your choice to delete the items. This action will free up space immediately and remove the files from your device permanently.
Final Words
Now that you know how to remove duplicates and similar photos from your iPhone, you’ve already taken a big step toward freeing up storage. While manually deleting duplicates works, using a dedicated cleaner app or similar tool can make the process faster and more efficient, as they often catch both exact duplicates and photos that are just slightly different.
If you’re still low on storage after tackling duplicates, consider deleting other unnecessary files that tend to pile up. Screenshots you no longer need, accidental live photos, and burst photos are good places to start. For videos, check out cinematic or time-lapse clips that may have lost their relevance.
Don’t stop at just the Photos app. To maximize storage, go through your apps, downloads, and other files to remove anything you no longer use. Set aside a bit of time, stay patient, and your iPhone will be noticeably more spacious. You’ve got this!